JetSet Tutorial 1
by Helge Timenes
Last Updated: November 27th 2013
Executive Overview
JetSet is a set of Eclipse plug-ins for quickly building XML to ASCII and XML to XML model transformation tools such as document generators and code generators. You do not have to know much about XML to use it, but it is useful to know what a Meta-Model and XML Schema is.
When working with JetSet you will need a source meta-model that describes the structure of the models you want to transform. If your output is also XML, you may also use a target meta-model describing the desired output model structure. JetSet can work with two types of meta-models: XML Schema and Ecore
Content
- Problem Description
- Preparations
- Creating the JetSet
- Generating the Code Generator
- Testing the Code Generator
- Conclusions
1 Problem Description
For the purpose of this tutorial, we will use the following scenario: You are given a meta-model in the form of a XML Schema (see Listing 1 below) containing elements and types that can be used to specify a network. The schema specifies that a network consists of network nodes which in turn contain a set of output messages.
<?xml version="1.0" encoding="UTF-8"?>
<xsd:schema targetNamespace="http://jetset.sf.net/tutorial/icd"
            xmlns:xsd="http://www.w3.org/2001/XMLSchema"
            xmlns:icd="http://jetset.sf.net/tutorial/icd">

   <xsd:complexType name="AbstractObject" abstract="true">
      <xsd:attribute name="Id" type="xsd:ID" use="required"/>
   </xsd:complexType>

   <xsd:complexType name="Message">
      <xsd:complexContent>
         <xsd:extension base="icd:AbstractObject">
            <xsd:sequence>
            </xsd:sequence>
         </xsd:extension>
      </xsd:complexContent>
   </xsd:complexType>

   <xsd:complexType name="NetworkNode">
      <xsd:complexContent>
         <xsd:extension base="icd:AbstractObject">
            <xsd:sequence>
               <xsd:element name="OutputMessage"
                            type="icd:Message"
                            minOccurs="0"
                            maxOccurs="unbounded"/>
            </xsd:sequence>
         </xsd:extension>
      </xsd:complexContent>
   </xsd:complexType>

   <xsd:complexType name="Network">
      <xsd:complexContent>
         <xsd:extension base="icd:AbstractObject">
            <xsd:sequence>
               <xsd:element name="NetworkNode"
                            type="icd:NetworkNode"
                            minOccurs="0"
                            maxOccurs="unbounded"/>
            </xsd:sequence>
         </xsd:extension>
      </xsd:complexContent>
   </xsd:complexType>

   <xsd:element name="Network" type="icd:Network"/>

</xsd:schema>
Your job is to create a code generator that is able to generate a simple data buffer handler for each message in any XML model that adheres to this meta-model. The data buffer handlers shall:
- Use the C language
- Manage data buffers as char-arrays of length 256
- Provide pointer access to the data buffer
- Provide a method that returns the size of the data buffer in number of bytes
Preparations
Requirements
This tutorial was written using the following software configuration:- Eclipse Java EE IDE for Web Developer (Helios Service Release 2, Build id: 20110218-0911)
- JetSet 3.0.0
Installation
- Download and install Eclipse as described on the eclipse website
-
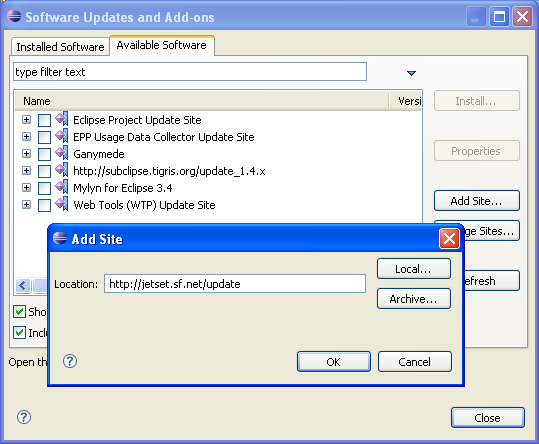
Install JetSet by adding the JetSet update site to the list of sites where Eclipse shall look for updates:
- Select Software Updates...from the Help menu.
- Select the Available Software tab
- Click on Add Site...
- Enter the URL to the JetSet update site: http://jetset.sf.net/update
- Expand the JetSet entry (make sure you have a connection to the internet) and select the check box for JetSet version 3.0.0
- Click on Install...
3 Creating the JetSet
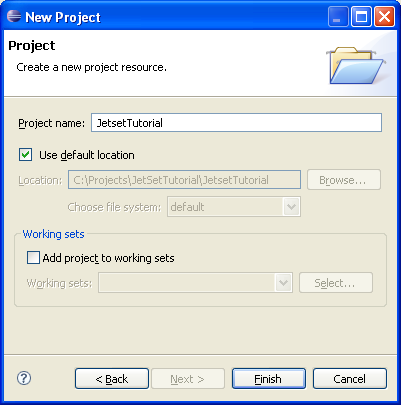
First we need to create a standard empty Eclipse project in which our JetSet can live.- Click on File → New → Project... from the Eclipse menu.
- Select Project from the General category.
- Fill in a project name (for example "JetsetTutorial")
- Click on the Finish button.
- Right-click on the newly created project
- Select New → File.
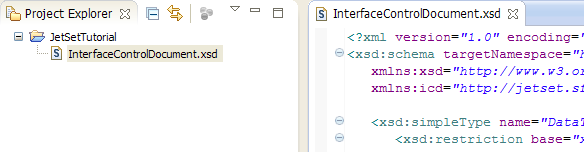
- Enter InterfaceControlDocument.xsd as file name.
- Click Finish. This will open up the Eclipse XML Schema editor with an empty file.
- Click the Source tab at the bottom of the XML editor.
- Paste the content of Listing 1 into the empty file and save it.
Your project workspace should now look something similar to Figure 02 below.
- Right-click on the newly created project
- Select New → Other... and locate the JetSet entry as shown in Figure 03.
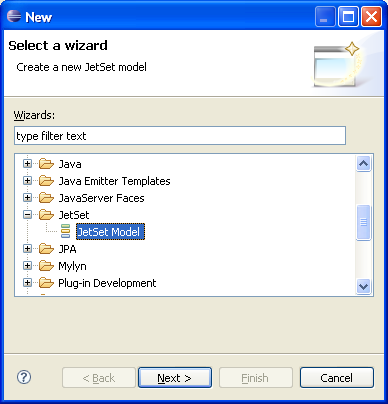
- Click on Next.
- Enter a file name width a ".jetset" extension (e.g. "Tutorial.jetset").
- Click on Next.
You should now be presented with the following dialog (Figure 04):
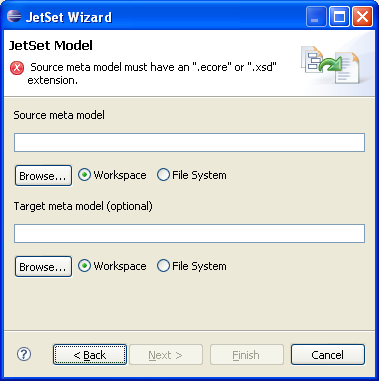
In the Source meta model field you have to enter the path to the meta model you wish to use as source meta-model. This path can be either an absolute system path or a relative path within your workspace. The Browse... button will let you browse for the meta model, either through the file system or your eclipse workspace, depending on which of the two radio buttons are selected.
Similarly, the Target meta model field lets you specify a target meta model, which is handy if you want to generate another XML file as output. But this is not within the scope of this tutorial.
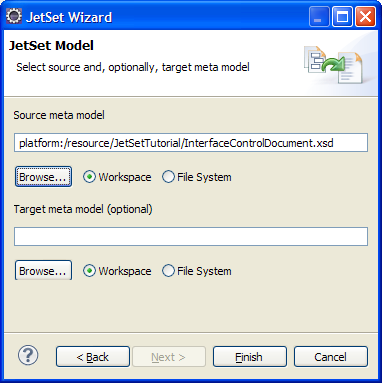
- Click the first Browse... button and select InterfaceControlDocument.xsd as source meta-model
- Click the Finish button.
After clicking the Finish button, JetSet editor will be opened showing the JetSet that you just created (Figure 06).
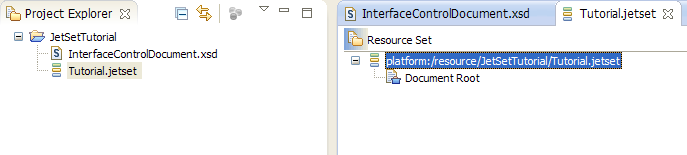
The JetSet editor consists of a tree where each node is associated with a type in the source meta model. Lets examine it a bit closer:
- Click on the Document Root node. This will bring the Properties View to the foreground.
You should see something similar to Figure 07.
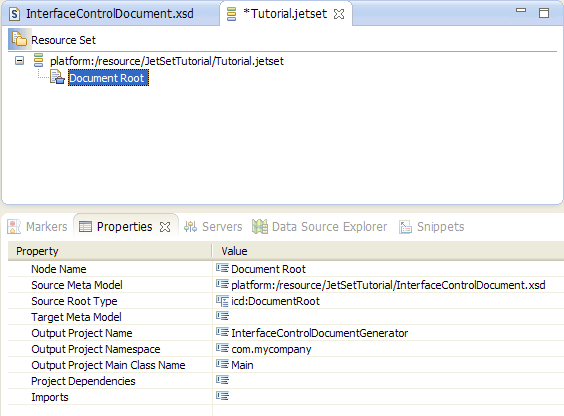
JetSet always tries to give nodes sensible names, in most cases derived from the source type with
which the node is associated, which in this case is icd:DocumentRoot.
This might seem odd, as there is no type named DocumentRoot in our meta model
The reason is that behind the scenes JetSet convert all XML schemas to Ecore models,
which are more expressive and easier to work with. The DocumentRoot is an artifact of this process
and is simply a type that contains all the top level elements defined in the XML schema. More about this shortly.
Let's take a closer look at the properties of this node:
- Node Name: The Node Name property is the name of the node. When adding new nodes to your tree, JetSet will give the new node a default name derived from the model class associated with the node. This can be overridden at any time by changing the value of this property.
- Source Meta Model: The Source Meta Model property defines the structure of the inputs of your code generator. It is the same as was specified in the wizard earlier. If desired you can change the meta-model at any time by changing this property, but beware that this may cause some inconsistencies (not covered in this tutorial).
-
Source Root Type: The Source Root Type property defines your entry point in the models. In most cases this will be the
DocumentRoot, but it need not be. The editor for this property lets you select any type defined in your source schema and,
if not the document root, your code generator will act on any instance of the selected type and their contents.
- Target Meta Model: The Target Meta Model property defines the structure of output XML models. As it is not part of this tutorial, this property can be left empty.
- Output Project Name: Based on the tree you define in the editor, JetSet will generate a standard Java project that is the actual code generator. The property Output Project Name is the name of this project. The default value is derived from the names of your source meta model, in our case InterfaceControlDocument.
- Output Project Namespace: All Java classes generated in the output project will use the same name space (i.e. belong to the same Java package). The property Output Project Namespace determines what this will be. Change the value of this property to whatever suits you. I will stick to the default "com.mycompany" for this tutorial.
-
Output Project Main Class Name: This property defines the name of the Java class containing the
main()method in the resulting generated output project. When everything is finished you will execute your code generator withjava [YourMainClassName]. - Project Dependencies: The Project Dependencies property allows you to specify existing Java projects containing utility classes you want to use from within your JetSet. Multiple projects are separated by commas. This is out of scope of this tutorial.
- Imports: If you do use classes located in other projects, you will need to specify the package(s) to which they belong. This is what the Imports property is for. Multiple packages are separated by commas. This is out of scope of this tutorial.
A Note on Nodes
A JetSet is created by adding nodes to the project node we created in the previous step. 12 different types of node exist, each providing different possibilities to extract information from the model:
-
 The Project Node is the root node of the JetSet. As described in the previous section, it contains information
pertaining to the entire JetSet tree. There is only one project node per JetSet
The Project Node is the root node of the JetSet. As described in the previous section, it contains information
pertaining to the entire JetSet tree. There is only one project node per JetSet
-
 File Nodes are used to define the output files of the code generation process. A JetSet must contain at least
one file node (otherwise nothing would be produced. The file names may be derived from model variables, as we will
see soon.
File Nodes are used to define the output files of the code generation process. A JetSet must contain at least
one file node (otherwise nothing would be produced. The file names may be derived from model variables, as we will
see soon.
-
 Iteration Nodes define iterations over containments, references or many-valued attributes. For instance, in the InterfaceControlDocument
meta-model used in this tutorial, the type
Iteration Nodes define iterations over containments, references or many-valued attributes. For instance, in the InterfaceControlDocument
meta-model used in this tutorial, the type NetworkNodecontains one or more elements of typeMessageunder the containment nameOutputMessage. You can use an iteration node to define a iteration of the typefor each OutputMessage in NetworkNode order do...
Note: Depending on the details of the iteration, the icon used for the iteration node will vary slightly:
 Containment (maxOccurs=1)
 Containment (maxOccurs=unbounded)
 Reference (maxOccurs=1)
 Reference (maxOccurs=unbounded)
 Iteration over a context collection (see Context Collection Node below)
-
 Text Nodes are the real work horses in the JetSet family. They are used to define any unstructured ASCII content you might want in your output files.
The text of a text node must be entered exactly as you want it to appear in your output, with variables (e.g. information extracted from the model)
wrapped in
Text Nodes are the real work horses in the JetSet family. They are used to define any unstructured ASCII content you might want in your output files.
The text of a text node must be entered exactly as you want it to appear in your output, with variables (e.g. information extracted from the model)
wrapped in <% %>brackets. (This is the Java Emitter template (JET) format that has lent its name to this tool.). Text Nodes also lets you specify a condition filter. These are used to only enable the node on certain conditions in the model. If you have specified a target meta model, XML Nodes can be used instead of Text Nodes. -
 Subtype Filter Nodes are useful for source meta models that use abstract types and inheritance.
-
 GoTo Nodes are used to jump from one location in the tree to another. This is handy
when the same type is being used several places in the meta model, or if the meta model
contains recursive references.
GoTo Nodes are used to jump from one location in the tree to another. This is handy
when the same type is being used several places in the meta model, or if the meta model
contains recursive references.
-
 GoTo Target Nodes are, as the name implies, the target to which a GoTo node links.
A GoTo target node can be linked to from multiple GoTo nodes, provided the GoTo node
is defined for the same type as the target GoTo node. NOTE: GoTo target nodes can only
be added to the project node of the JetSet.
GoTo Target Nodes are, as the name implies, the target to which a GoTo node links.
A GoTo target node can be linked to from multiple GoTo nodes, provided the GoTo node
is defined for the same type as the target GoTo node. NOTE: GoTo target nodes can only
be added to the project node of the JetSet.
-
 Context Variable Nodes are used to store key-value "variables" one place in the JetSet tree, that can be used elsewhere
-
 Context Collection Nodes are used to build up collections of information that can be used as basis for iterations elsewhere
-
 Virtual Attribute Nodes are used extend the meta model by defining new model attributes and a schematic for how to derive values for these when the code generator is executed.
-
 Group Nodes have no generative effect, they are simply a way organizing
your JetSet tree, should it become unreadable through excessive use of the other nodes. It does provide a condition filter (similarly to the Text Node) which can be used to enable or disable whole branches of the JetSet tree depending on conditions in the model.
Group Nodes have no generative effect, they are simply a way organizing
your JetSet tree, should it become unreadable through excessive use of the other nodes. It does provide a condition filter (similarly to the Text Node) which can be used to enable or disable whole branches of the JetSet tree depending on conditions in the model.
-
 Xml Nodes are similar to the text nodes except that they impose constraints on your outputs such that it complies to the structure of your target meta model. Each Xml Node will produce
an XML element in your output. Which element is produced you can specify in the properties of the node, but it is limited to the element relations specified in your target meta model.
The Xml Node offers a list of properties corresponding to the attributes of the selected target type, and lets you fill this with values derived from your source model (using the JET notation mentioned above).
The Xml Node also takes care of closing brackets and tags as well as indenting the text based on where in your target meta model you operate.
Xml Nodes are similar to the text nodes except that they impose constraints on your outputs such that it complies to the structure of your target meta model. Each Xml Node will produce
an XML element in your output. Which element is produced you can specify in the properties of the node, but it is limited to the element relations specified in your target meta model.
The Xml Node offers a list of properties corresponding to the attributes of the selected target type, and lets you fill this with values derived from your source model (using the JET notation mentioned above).
The Xml Node also takes care of closing brackets and tags as well as indenting the text based on where in your target meta model you operate.
Editing the JetSet
Returning to our example, we will now define a simple JetSet for a code generator that generates message handlers as specified in the beginning of this tutorial. First step is to generate a file for each message
- Right-click the project node (named System)
- Select New Child → Iteration Node.
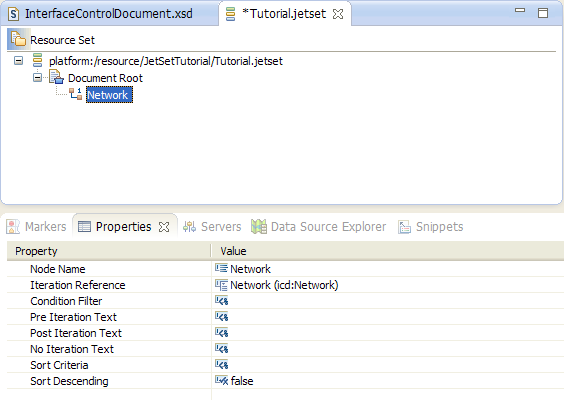
A new node will be added to the JetSet tree with name defaulting to Network (Figure 08). This is because
JetSet, knows that the Network element (of type icd:Network) is top level element of the source meta model and thus the only possible
reference from the DocumentRoot type. Furthermore, this is a single-valued reference, hence the little "1" in the icon. As you may notice, the Iteration Node has many properties. We'll get to these later in this example. The semantic of this node is akin to for the Network in Document do...
As we remember from the meta model (Listing 1) the network consists of network nodes, which in turn contains output messages. To generate a file for each message we thus need to two more iterations: for each NetworkNode in Network do... and for each OutputMessage in NetworkNode do.... At that level we can then add a File Node.
- Right click on the Network node.
- Select New Child → Iteration Node.
- Right click on the newly created NetworkNodes node.
- Select New Child → Iteration Node.
- Right click on the newly created OutputMessages node.
- Select New Child → File Node.
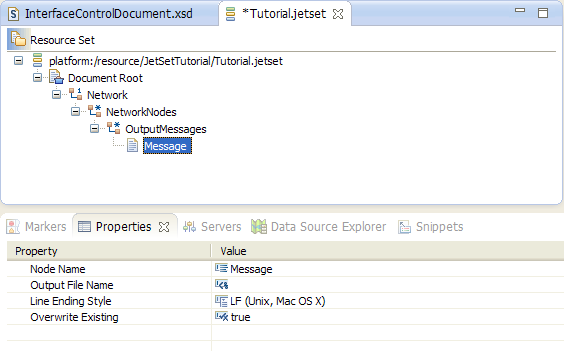
The file node's default name is Message which reflects that the model object from which it can extract information is
of type icd:Message.
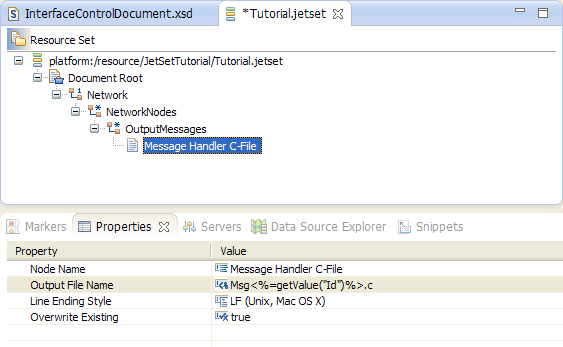
To make things a bit more readable, let us change the node name to "Message Handler C-File" as this is what our file node will represent. The name of the nodes in your
JetSet tree will have no effect on the code generation process. They are only there for making your tree more readable and easier to understand.
-
Type "Message Handler C-File" in the property value field for Node Name.
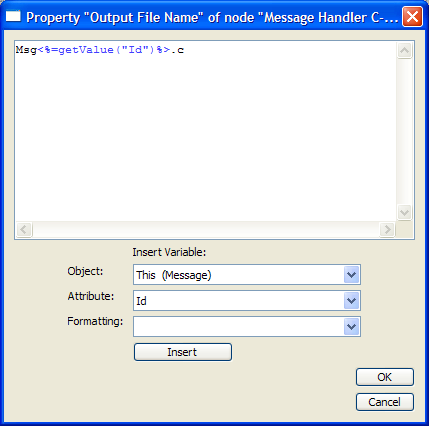
Now, let us set the Output File Name property such that each file will be named after the ID of the message it represents plus a prefix "Msg".
- Click the ... button in the value field of the Output File Name property.
-
In the text field dialog that appears, write
Msg. - Select pull-down menu called Attribute and select Id.
- Click on Insert.
-
Add a file extension by typing
.cafter the inserted blue string. - Make sure things look similar to Figure 10 below and click on Ok.
There are a few things worth mentioning about what we just did. First of all, the string that was automatically inserted
is delimited by <% and %> and shown in blue color: This is the JET syntax mentioned before.
Everything inside the <% %> delimiters must be valid Java code. If you are not a Java programmer,
don't worry about the next paragraph: The attribute selection and formatting pull-downs and insert button should cover most
of your needs.
Note for Java programmers: These little blue lines of code should be an invitation to deploy your crazy hacker skillz. The
getValue(String attributeName) method is a built in convenience for extracting data from your model. It always returns a
string containing the attribute value (empty string if not found). If you want to modify the model object directly, you can access it by calling
modelStack.peek(), which returns an instance of the EMF class
EObject.
You can immediately manipulate the model object or its attributes using all java.lang and java.util classes.
More, including your custom code, can be added with the imports property of the Project Node.
Back to the JetSet tree we now have the following (Figure 11):
A generator based on this tree would not really generate anything useful. Just one empty file per message. But before we continue, you may have noticed the little asterisk next to the file name in the editor tab? This means that it is time to save the work we have done so far and go and get another cup of coffee...
- Press Alt + F + S.
- Grab coffee (required).
- Go back to your desk and continue this tutorial.
Generating Content
Now we are ready to specify how the content of each file will be generated. For this we need a Text Node
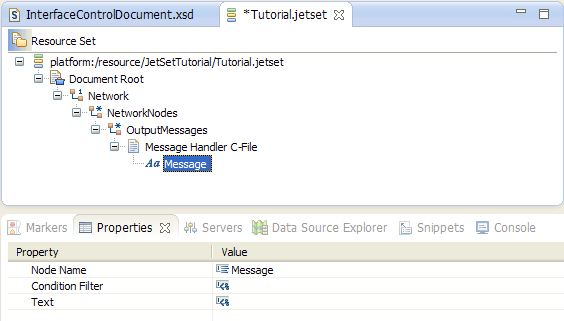
Now, let us set the Text property with a mix of static and variable text
- Click the ... button in the value field of the Text property of the Message node.
- In the text field dialog that appears, type or copy in the content of Listing 2.
- Click OK.
/*************************************************************

  Data buffer handler for Message <%=getValue("Id")%>
  Produced by Network Node <%=getValue(getContainer(1), "Id")%>

*************************************************************/


/*
   Data buffer array
*/

static char Msg<%=getValue("Id")%>_Buffer[256];


/*
   Returns a pointer to the buffer array
*/

char* Msg<%=getValue("Id")%>_GetBuffer(){

   return Msg<%=getValue("Id")%>_Buffer;

}


/*
   Returns the size of the data buffer
*/

int Msg<%=getValue("Id")%>_GetBufferSize(){

   return 256;

}
Note that the text within the <%= and %> tags become blue. These could also have been entered by selecting an attribute in the pull-down menu and clicking Insert
4 Generating The Code Generator
We have now a complete specification of a code generator for network models compliant to the InterfaceControlDocument.xsd schema. Now we can generate the actual code generator:
- Right click on any node in the JetSet tree.
- Select JetSet → Generate Model Transformator.
You will notice that a new Project called InterfaceControlDocumentGenerator has appeared in the project explorer view (Figure 13). As mentioned at the start of this tutorial, the name of this project is taken from the Output Project Name property of the Project Node ("DocumentRoot" in our case).
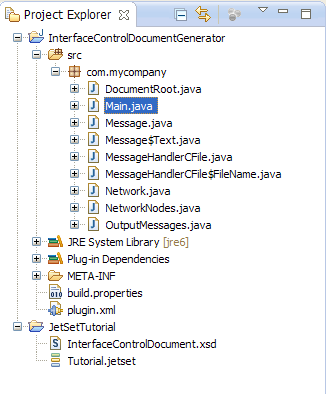
This project is the actual code generator: It is a standard java project containing several classes generated from the nodes in the JetSet tree, plus a class named Main (also specified in the Project Node). This class contains a main function that takes three arguments:
- Path to meta-model
- Path to the model to be transformed
- Path to a directory where the transformed artifacts shall be stored
This is a normal java project and can be run within Eclipse like any other Java project. In many cases you would however want to trigger your code generator from scripts or command line tools. JetSet offers a quick way to export this project with all its dependencies. It even generates a batch file to run it all. Let's try it.
- Right click on any node in the JetSet tree.
- Select JetSet → Export Stand-Alone Executable....
- Select a directory where you want the executable exported, for example C:\Temp\JetSetTutorial\.
- Click Ok
If you look in the directory you selected above you should now see the following files:
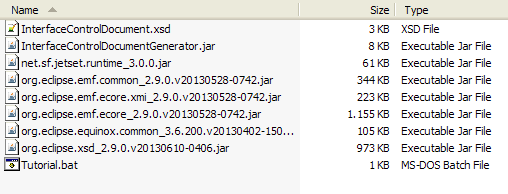
- Here the net.sf.jetset.runtime_3.0.0.jar file is a run-time JetSet library needed for the execution of the code generator.
- The org.eclipse... files are eclipse dependencies needed when running the code generator outside of eclipse.
- The InterfaceControlDocumentGenerator.jar file is the code generator itself. It contains all classes generated from your JetSet tree.
- Tutorial.bat is a batch file to execute the transformation tool with all its dependencies. Its name is taken from the name of the .jetset file (in this case "Tutorial")
- InterfaceControlDocument.xsd is a copy of our source meta model. This is needed to validate the input XML models before translation.
You now have a complete stand-alone code generator.
5 Testing the Code Generator
To test our code generator we need a network model instance. Any XML file following the format dictated by the InterfaceControlDocument.xsd meta model will do, but for this tutorial we can use the simple model given in Listing 3. You can get it here or simply copy from Listing 3. Save it to a local file on your hard drive, for instance C:\Temp\JetSetTutorial\InterfaceControlDocument.xml.
<?xml version="1.0" encoding="UTF-8"?>
<icd:Network xmlns:icd="http://jetset.sf.net/tutorial/icd"
             xmlns:xsi="http://www.w3.org/2001/XMLSchema-instance"
             Id="JetSetTutorialExmaple">

   <NetworkNode Id="ControlComputer">
      <OutputMessage Id="ActuatorCommands"/>
   </NetworkNode>

   <NetworkNode Id="NavigationComputer">
      <OutputMessage Id="SensorFusionData"/>
      <OutputMessage Id="PositionData"/>
      <OutputMessage Id="TimeData"/>
   </NetworkNode>

   <NetworkNode Id="RadarAltimeter">
      <OutputMessage Id="RadarData"/>
   </NetworkNode>

   <NetworkNode Id="AirDataSensor">
      <OutputMessage Id="AirData"/>
   </NetworkNode>

   <NetworkNode Id="InertialSensor">
      <OutputMessage Id="InertialState"/>
   </NetworkNode>

   <NetworkNode Id="GPS">
      <OutputMessage Id="GpsLocation"/>
      <OutputMessage Id="GpsSatInfo"/>
   </NetworkNode>

</icd:Network>
Though you can run the code generator from within eclipse, we will test it in stand-alone mode, using the batch file we generated in the last chapter.
- Open up a command prompt console (Windows users: Start → Run and enter "cmd.exe").
-
Change to the directory where the stand-alone executable and batch file was generated (e.g.
cd C:\Temp\JetSetTutorial\). -
Trigger the code generator using the generated batch file with the name of the model file and name of directory where we want the output to be generated. For example
Tutorial InterfaceControlDocument.xml .
to generate our output in the current directory
If we have done everything right so far, you will notice that several files have appeared in the directory you specified as output directory. Its content should be similar to that shown in Listing 4 below. This is our generated C code, compliant to the requirements stated in section 1. Not very complex, but it illustrates the basics of using JetSet to design code generators.
/*************************************************************

  Data buffer handler for Message ActuatorCommands
  Produced by Network Node ControlComputer

*************************************************************/


/*
   Data buffer array
*/

static char MsgActuatorCommands_Buffer[256];


/*
   Returns a pointer to the buffer array
*/

char* MsgActuatorCommands_GetBuffer(){

   return MsgActuatorCommands_Buffer;

}


/*
   Returns the size of the data buffer
*/

int MsgActuatorCommands_GetBufferSize(){

   return 256;

}
6 Conclusion
We have seen how we can use JetSet to quickly design a code generator that generates something useful from a XML model. JetSet offers a easy to understand graphical editor to define each step of the transformation, and does all the grunt work automatically. You don't need to be an XML wizard to create a code generator.
JetSet also offers more advanced features, such as
- Support for abstract types and type inheritance through Subtype Filter Nodes,
- Storage and retrieval of local variables through Context Variable Nodes,
- Extension of model and meta model through Virtual Attribute Nodes
- Conditional Text Nodes by using the Condition property
- Filtered iterations by using the Condition Filter property of Iteration Nodes
- Sorting of iterations using the Iteration Node Sort Criteria
The JetSet model used to make this tutorial can be found here